Thursday, October 04, 2012

Re-Covering "Red"

The heavy brown paper tympan cover that I made for "Red" (see HERE) was worse than tatty and so it was all stripped away ready for a new one. This time round, I decided to try a fairly smooth bookcloth, which I hoped. The general principle was the same - to soak the cover before fixing it to the tympan frame so that it dried as tight as a drum. We sponged the bookcloth on each side and then on the first again so that it was soaked but not so wet that water pooled on it's surface:


I laid the bare frame on the wet bookcloth:


I then started to cut tabs of cloth which were covered in bookbinding paste, pulled tight and glued down. A bone folder was used to push the tab under the frame (see later):


The tabs look rough but they can be trimmed once the cover has dried.


The same procedure was carrid out with the inner tympan frame:


This detail shows hoe each tab is pushed under the frame to keep it secure and tight:


The two parts of the tympan were left to dry thoroughly in the studio:


The next morning, both parts were dry, tight and drummed in a very satisfying manner when tapped. I trimmed the excess tabs, packed and reassembled the tympan and reconnected it to the press. I made the top neater with some heavy brown paper:


Red is looking rather good...


... and is back to work again:


Saturday, March 28, 2009

Both handpresses have been in constant use since the last post and they are both running extremely well with just a little routine maintenance. I still need to get a handle cast for the 1865 Albion but it certainly works as it is. My next job is to recover both tympans - this time, I think, with cloth as the strong brown paper has ripped in a few places.

Here is a photo of "Red" in an untidy studio:


*Click* on the photo to enlarge it

I am printing engravings for a special edition of a chapter from Philip Pullman's "Northern Lights". Here is the title page block in place:


Here is the inking table:


And here, proofs are drying on the ceiling rack:

Thursday, January 10, 2008

New Year Maintainance

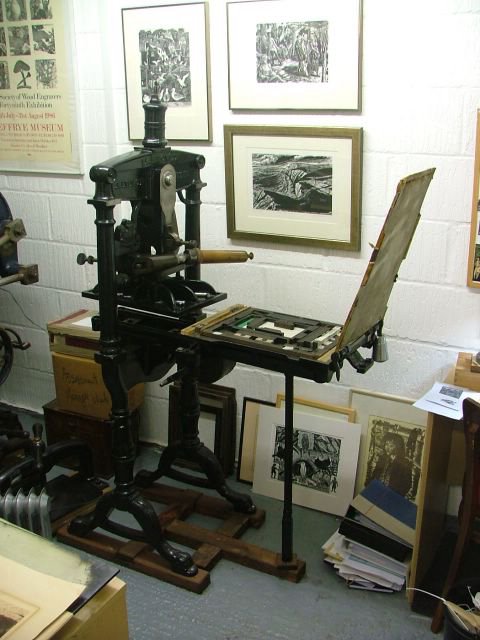
The small 1865 Albion has has a great deal of use during the last year - I have used it for almost everything that I have printed; most jobs in an edition of at least 100 prints. With all but the smallest blocks, I brace myself against the rails to add power to my pull. As a result, they have gradually slipped and I need to sort that out with much work lined up in the studio. The first photograph shows the problem:


The main body of the press if facing the camera squarely. The two rails at the front are distictly turned to the right. Here is the rather worn tympan which will be removed first:


After removing the tympan, I can undo the turning tapes, carefully lift the bed of the press off the rails and then remove the turning mechanism.


The rails easily pulled back into position and I could tighten them some more. There is a balance to be struck here - I wanted the rails to be tight but I don't like to overtighten these Victorian bolts. If the rail still moves a little over the next few months, I can always repeat this procedure.


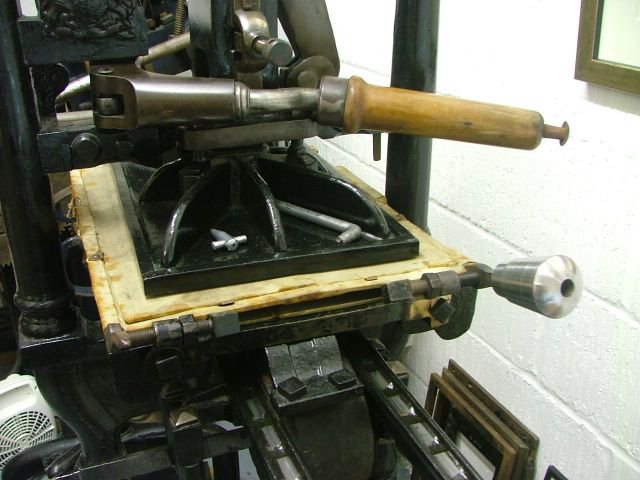
Here is the turning mechanism. The next job was to lift it and fix it back into position:


I ran a thin line of oil along the rails before lifting the bed back into place. I am always wary of this as my foot is still marked from breaking the fall of this piece on the first day that I saw the press (see July 2005).


The tapes were then reconnected to the bed. Experienced handpress users will note that, in my haste, I had not threaded them over the cross bar of the rails - I had to do this again after realising that the bed would not wind in.


Once I wound the bed in, I could check the alignment of the platen against the line that I marked that I made on the tympan when I first re-covered it. As you see, the line is nicely parallel to the edge of the platen:


Here is the "after" photograph to compare with the first. The rails are now back in their proper place. Notice that the platen is slightly askew. This is very common in Albions. Since it does not affect the printing process, I am happy to leave it be.


Job Done! The Albion is back in operation and I am covered in oil. Does life get better than this?

Tuesday, July 03, 2007

Covering the Tympan of the 1902 Albion Handpress

I have rather neglected the large Albion press recently. It was a question of making time to cover the tympan; there was always something else that I had to do.

Finally, I needed to print from some larger blocks and so I could delay no longer. Here we go...

Saturday, June 16, 2007

Catching Up

Its such a long time since I posted to this blog. The small Albion is in regular use for day to day printing from engraving blocks. I have made some small improvements which I will highlight soon. In the meantime, I made a short "peepshow" style video of the printing of a bookplate.

Notes

1. I am using lots of layers of very thin ink to get the result I want with this block.
2. I use sections cut from clear plastic folders to hold the paper during printing.

Now... on with the video

Wednesday, September 06, 2006

A Bigger Press

My new Albion arrives on Monday. I am buying this unseen, though I have received a photo of part of it:


This is much bigger than my current Albion and the idea is that I can not only edition current large blocks but also plan larger images for the future.

This has all set a flurry of activity; I need to clear space in the studio and also find the money to fund this purchase; thesepresses are not cheap! I will continue to work on the money tomorrow but the current task is to dis-assemble the Arab press to point that it will get through the door. This Herculean task continues tomorrow.

Saturday, October 29, 2005

October 2005

Here are some photos of the press as it stands at the end of October 2005. It is working well but still needs a little work.
Here is the press as it stands at the end of October 2005, nearly a year after receiving it. The tympan works, but needs a new cover - and there is a bright new counterweight. Posted by Picasa
Here is another view of the repaired hinge bar. Posted by Picasa
Here you can see the new counterweight and the bar that fixes the tympan to the bed Posted by Picasa
Here is the new metal counterweight. I have decided to keep the bright metal, rather than paint it. Posted by Picasa